This picture is my still life pastel picture. When we came into class there was a variety of baskets and vases spread out on the desk for us to draw. The first step in making this was to outline the objects with pencil on a large piece of paper. After we had the initial outlines we could color the things with pastels and create the different shadows and highlights.
Friday, December 9, 2011
This week we made ceramic bowls. The first step in making them was to roll out a slab of clay in a slab roller. We used the big slab roller to make sure that the clay was an even thickness. After the clay was rolled out we shaped it over a plastic bowl and began decorating. Mr. Sand's theme was "organic" so I chose to use some curved shapes and lines with dots to give it a distinctive look. I tried to slip and score some added clay pieces, but left them out because they were too thin and weak. After we finished constructing the bowl we let them dry and put them in the kiln. Once they were fired we topped them off with glaze to give each bowl a neat and shiny look. They went to the kiln again today.
Thursday, November 10, 2011
This picture shows my group's perspective art project. It took a while to finally get this final look and the work being put into it was difficult, but the end product was really cool. The idea of this project was that we would project a picture with an opposite saying on it onto cardboard boxes and place them at different distances. When you stand in the right place the picture comes into view, but at other angles you can only see pieces of the whole. Instead of using boxes, we cut cardboard fins and built a wooden base to attach them to. The frame looks somewhat like a ladder and had to be reassembled a few times before we could get it to work. In the end the different colors and shapes came together perfectly to produce this picture.
Monday, October 24, 2011
This picture shows me spray painting my stencil of Lionel Messi. I loved this project because it took a lot creative construction to make the end product. The first step to creating the stencil was to make the frame. We cut a wooden frame from an about 80 inch long piece of wood. Then, we nailed the frame together. The last step to making the frame was to staple-gun a piece of cardboard to the back. After my frame was assembled I painted the whole thing blue. To make the stencil I found a picture of Messi, and projected it onto a posterboard. I traced all the different shadows and cut the shapes out. When all of that was finished I spray painted the figure white and black onto the blue frame. Finally I painted outside of the frame black for my finished stencil.
Tuesday, October 11, 2011
Brick Pixel Project
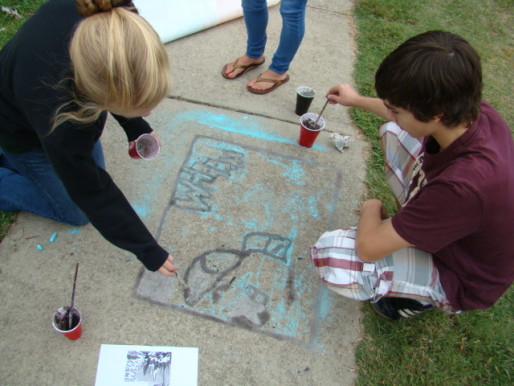
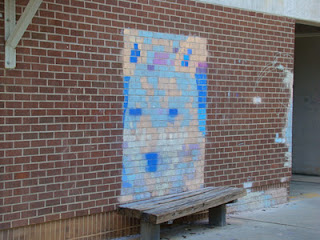
This is my group's brick pixel project. The five of us took four days to fill in the blocks and create this picture. The goal was to create a wolf using blue, yellow, orange, and purple chalk. Unfortunately we ran out of purple chalk and the blue didn't show up as we had hoped, so it turned out a little sloppy. The steps to making this were pretty simple, first we pixelated an animal picture and changed the colors on the computer. After printing off the picture we went to the courtyard. Each brick was divided into three parts, for three different pixels. By looking at the printed picture of our wolf, we used the different colors of chalk to fill in each block and eventually got the shape of the wolf.
Wednesday, October 5, 2011
This is my value portrait of Hayden. The first step to drawing a value portrait is to get a picture of a person with different shadows. I traced Hayden's picture and all of the different shades on his face. Then I shaded in the parts to create the shadow effect. The goal was not to be afraid of the dark, so the picture would be as realistic as possible, but that didn't work too well for me.
Wednesday, September 28, 2011
This is my pastel oil painting of Annie. The first step to making this was to get a picture of some one. I took a picture of Annie, then used the grid technique to enlarge her picture. Next, I drew her facial features which was much easier after we learned some techniques to drawing them. I picked red for her face, the most difficult part of coloring in the face had to be the shading. Next was her hair, which was easy because I could use yellow and green to and high lights and low lights with the blue. Her eyes and mouth were hard because the pastels weren't easy to draw details with, but I'm really surprised at how good this looks.
Tuesday, September 20, 2011
This is my group working on the mud painting project. First we got a famous picture and used the computer to put it into black and white coloring. We enlarged the picture on the projector and traced the different shades onto large paper. The hardest part was punching tiny holes along all of the lines, but after we finished that we took it outside and rubbed chalk over the top. This left the outline of the picture on the sidewalk. Finally we used the four different shades of mud to paint our picture.
Wednesday, September 14, 2011
This is my cassette tape soccer ball. By using the tape from an old cassette tape I was able to cut and glue the pieces into the shape of a soccer ball. I really enjoyed this project because we could be as creative as we wanted. It was difficult at first, since our drawings were contour lines, which means we couldn't pick up our pencils while drawing. That method didn't work out too well for me, but eventually I got this. If I could do this again I would try for a more detailed picture.
Subscribe to:
Posts (Atom)